I'm very pleased with this glaze firing. The test tiles fired great. No visible signs of crazing or pinholes. I plan to test the tiles further for stability using Ron Roy and John Hesselberth's techniques. The following pics demonstrate how the kiln was loaded for this firing.
NOTE: The following points apply to any media I may be working in. I can see that I'll be repeating them often in the future! This info is intended for those of you who:
- are very new to ceramics who may not have the advantage of taking workshops or classes (hopefully you have taken at least a few classes in ceramics) and want to see examples of how someone else fires their pieces
- maybe you are familiar with ceramics but, like me, you enjoy seeing how other potters work, no matter what their (or your) level of experience. Each of us has our own way of doing things and this is just my way of working through/solving problems in 'the process' of creating. I'm a strong believer in 'there's always a better way'.
- have no experience with ceramics what-so-ever, but just enjoy reading blogs on the subject!
Top shelf was a 'half' shelf which held a bowl:

Next shelf, jars and some test tiles: I used 'wadding' to separate the lid from the glaze on the jar at left. Some still adhered to the glaze-where the heck is that dremel...

Third shelf ('empty' areas are where the posts were placed):

Bottom shelf:

As you can see, I have a teeny-tiny kiln. But I like it and it's all I could (and still can for the time being) afford at the time I bought it. Anyway, a larger one wouldn't fit my kiln room. I need to purchase about two or three more shelves and I'll be able to fire more jars and other items that don't take up too much space vertically.
Below are some pics of my test tiles. I held the firing for 30 mins. at 2185 (^5 temp.) degs. Far. which took my kiln (every kiln is different, so always use 'witness cones' to know exactly how high your firing actually went) to a little past ^6, almost to ^7 - maybe too far for the Ardvark clay, which is a ^5 clay. However, it didn't seem to hurt the glazes or clay at all. No blistering of glazes or slumping of the bisqueware.
Unloading the Kiln:
 Notice in above illus. the placement of witness cones for their particular shelf. See how pieces positioned behind the witness cone on the left almost went to a ^7 (the cone 7 is bent at about 11 o'clock. A bend to '9 O'clock' would have been a ^7 fire), while the witness cone shown on the far right in front of its pieces (bottom shelf location) the middle cone, cone 6, is only at 11 O'clock, meaning it only fired to a full ^5. However, I have to admit, I'm cheap and didn't want to waste using a witness pack that had a 'broken' cone 5 and 6 on it, so I think it actually went to a full cone 6. I'll try to remember to explain more about witness cones - what they are and how I make and use them in a later post.
Detail of test tiles:
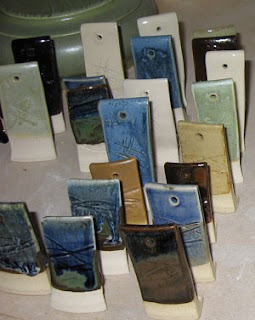

Well, that's all for now. All of the glazes, or most of them are from Mastering Cone 6 Glazes, by Ron Roy and John Hesselberth. A good source if you're interested in ^6 firing. Later...

Bottom shelf:

As you can see, I have a teeny-tiny kiln. But I like it and it's all I could (and still can for the time being) afford at the time I bought it. Anyway, a larger one wouldn't fit my kiln room. I need to purchase about two or three more shelves and I'll be able to fire more jars and other items that don't take up too much space vertically.
Below are some pics of my test tiles. I held the firing for 30 mins. at 2185 (^5 temp.) degs. Far. which took my kiln (every kiln is different, so always use 'witness cones' to know exactly how high your firing actually went) to a little past ^6, almost to ^7 - maybe too far for the Ardvark clay, which is a ^5 clay. However, it didn't seem to hurt the glazes or clay at all. No blistering of glazes or slumping of the bisqueware.
Unloading the Kiln:
As I unload the kiln, I arrange the pieces on my kiln room shelves in the order they were in the kiln. This way, I can make note of where their location was in the kiln when I record the results in my notebook. In other words, pieces on the top shelf in the kiln correlate to how they're placed on my kiln room shelves, with the appropriate witness cone placed in front of each section. I write on the bottom of the witness cone with a fine-point sharpie, the kiln shelf location(e.g. top 'half-shelf';'2nd shelf'; 'third f/top', etc.). Now this is probably not necessary, unless my kiln were to fire very unevenly (which it seldom does) and affect the pieces' location in the kiln, but I do it anyway so I won't have regrets later:
 Notice in above illus. the placement of witness cones for their particular shelf. See how pieces positioned behind the witness cone on the left almost went to a ^7 (the cone 7 is bent at about 11 o'clock. A bend to '9 O'clock' would have been a ^7 fire), while the witness cone shown on the far right in front of its pieces (bottom shelf location) the middle cone, cone 6, is only at 11 O'clock, meaning it only fired to a full ^5. However, I have to admit, I'm cheap and didn't want to waste using a witness pack that had a 'broken' cone 5 and 6 on it, so I think it actually went to a full cone 6. I'll try to remember to explain more about witness cones - what they are and how I make and use them in a later post.

Well, that's all for now. All of the glazes, or most of them are from Mastering Cone 6 Glazes, by Ron Roy and John Hesselberth. A good source if you're interested in ^6 firing. Later...


